

 By Phil Scandura/photos by the author
Who would believe that in a space of little more than two square inches, you could control 12 lighting outputs connected to grain-of-wheat bulbs or LEDs — and do so using Digital Command Control (DCC) or a 2.4 GHz hand-held remote control! With the new Light Genie product from Model Rectifier Corporation (MRC), you can. In addition, you don’t just have on/off control; Light Genie gives you 20 different lighting effects that you can assign to each zone — effects such as simulated highway or railroad f lashing lights, good for traffic lights, crossing signals, roadside barriers, and tower warning lights. You can simulate gyrating lights, strobe lights, and rotating beacons. You can even create special f lickering effects for campfires, gas lamps, and arc welders. With this many effects, you can use Light Genie for all types of applications, including structures, cars, trucks, ships, aircraft, trains, or even UFOs!
For this review, I’ve focused primarily on model railroad applications, using a variety of lighting products (both grain-of-wheat bulbs and LEDs) listed at the end of this review. However, before we start having fun, we need to respect the electrical limitations of the Light Genie.
Important Electrical Characteristics
Read the included user manual carefully. You’ll find that the 12 lighting outputs are limited to 100ma per output; however, the total Light Genie output is limited to 1Amp, so you won’t be able to load each output to the maximum. If you are using LEDs, which typically draw about 20ma each, one lighting output can safely support four LEDs. On the other hand, if you are using incandescent bulbs, they can draw upwards of 60ma to 80ma, depending on the physical size and quality of the bulb. While Light Genie supports all model railroading scales, the smaller scales (e.g., Z, N, and HO) tend to use LEDs for lighting accessories. The larger scales (e.g., S, O, and G) tend to Bottom line: it is important to understand the current load of the lighting accessories you plan to control.
MRC designed its Light Genie to handle an input voltage between 12 and 18 volts, DC or AC (the circuit board includes the necessary rectification). Regardless of the input voltage provided to the Light Genie, the lighting outputs are limited to 12 volts DC; providing a higher input voltage won’t result in a higher output voltage. You can connect the Light Genie to a “wall-wart” power supply, or connect it to DCC track bus similar to other DCC accessories. If you choose to tap off the DCC track bus, be aware that a fully loaded Light Genie can draw up to 1 Amp of power from the track bus. In the smaller scales, that typically translates to the equivalent of three or four locomotives. In the larger scales, that’s one or two locomotives. If you intend to operate several DCC locomotives, I would advise connecting the Light Genie to its own power source instead of the DCC track bus to ensure you have plenty of power for your locomotives.
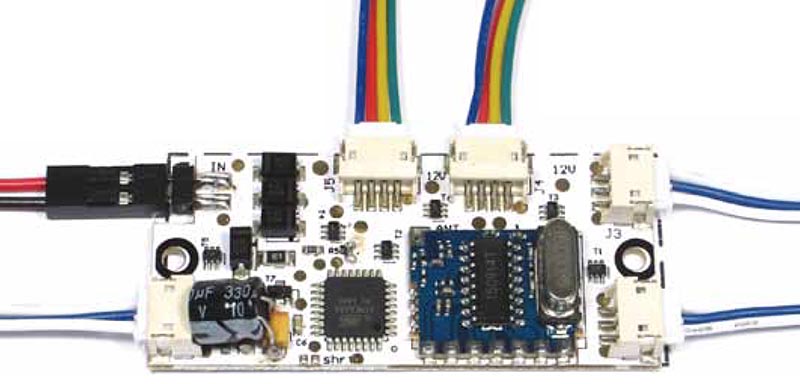
In a space of just over two square inches, MRC Light Genie allows you to control 12 lighting outputs distributed between five Zones using either DCC or its hand-held remote. On the top left side, you’ll see red and white wires coming from the power supply into the circuit board. The five zones run counter-clockwise, beginning below the power input and around to the top of the unit in this image.
Since the Light Genie includes a DCC decoder that can be programmed and used to control the lighting outputs, you’ll want to connect it to a programming track via a double-poll, double-throw switch (DPDT) such that it can be powered by the wall-wart supply during operation or by the DCC programming track during programming. In testing, I found that using the wireless remote was a more convenient method of controlling the outputs rather than the DCC throttle.
Finally, the Light Genie does not include on-board resistors to limit the voltage for LED applications. Since LEDs can only handle 3 volts DC, connecting them directly to the 12-volt output will destroy them. The Light Genie comes with ten 470 ohm resistors for use with LEDs; the user manual explains how and when to use them.
Wiring
The Light Genie recommends wiring in series only and warns against wiring in parallel. It does not justify this recommendation, other than to refer you to MRC customer service if you really need parallel wiring. Fortunately, the user manual includes several wiring diagram examples that should cover most wiring scenarios.
Output Zones 1, 2, and 3 each control two lighting outputs. The blue wire is the shared 12-volt DC common for each Zone, and the two white wires are the returns for each output. Typical uses for these Zones include structure lighting, emergency vehicle f lashers, and railroad crossing flashers.
Output Zones 4 and 5 each control three lighting outputs. The blue wire is the shared 12-volt DC common for each Zone, and the red, yellow, and green wires are the returns for each output. As you may have guessed based on the wiring colors, typical uses for these Zones include traffic lights, highway warning arrows, and tower warning lights.
Of course, these are only suggestions. With 20 different lighting effects, besides just on/off control, let your imagination run wild and experiment with different effects.
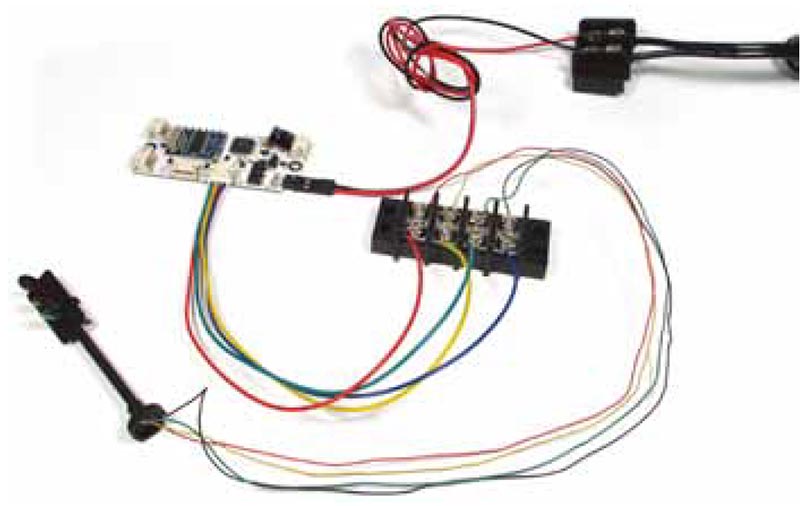
When hooking up your lighting accessories to the MRC Light Genie, the use of screw terminal strips provides a solder-free, quick and easy method. The unit is illustrated with a Model Power signal connected and ready for installation and operation.
Controlling via the Wireless Remote
One of the first effects I tried out with the Light Genie was the traffic light. On my previous layout, I had designed a traffic light controller circuit using a microcontroller and custom programming. I was very proud of it, but it most certainly took a significant amount of effort to create. With the Light Genie, it took less than five minutes to achieve the same result. To protect an intersection, I used Zones 4 and 5 programmed as Traffic Street Lights (effect 2). Zone 4 protects the north-south route, and Zone 5 protects the east-west route. The Light Genie automatically synchronizes the two lights so that when north-south shows Green, east-west shows Red. This is quite handy and easy to hook up.
Programming using the remote is simple. However, until you get familiar with how each effect looks, you might lose your place when sequencing through the effects. It’s not clear in the packaged documentation what the default effect setting is for each Zone. In my case, Zone 4 defaulted to Traffic Street Light (effect 2) while Zone 5 defaulted to Sequential Flash with Pause (effect 1) — the type intended to control a warning arrow sign such as one might see preceding a highway construction zone. When I first hooked up the two traffic lights, I was confused why one worked as expected (sequencing the green, yellow, and red with typical delays), while the other sequenced the lights much faster, reminding me of chase lights.
Speaking of the green-yellow-red traffic light sequence, one shortcoming of this effect is that it does not support the ability to adjust the sequence rate (or duty cycle, for those more comfortable with that term). It is very fast, providing about five seconds for green, one second for yellow, and five seconds for red. All the other lighting effects provide an adjustable rate.
I did have trouble testing with the O-scale Railroad Crossing Signal Set (#6381). Each signal has only two wires and is equipped with a f lasher circuit in the base of the signal. After the circuit “warms up” (about 20 seconds), the signal begins alternating between the two lights (i.e., f lashing). This circuit works correctly when connected directly to a voltage source, but not when connected to an output of the Light Genie, even when that output is configured for simple on/off control (effect 0). Neither the documentation on the crossing signal set box or the MRC website give any indication of the required input voltage, but I suspect the 12 volts provided by the Light Genie isn’t enough to properly activate the flasher. The signals are packaged in pairs (one for each side of the track). On one signal, only one light would turn on and stay on; I couldn’t get it to light at all with the other signal. Connecting them directly to 16 volts enabled them to work as designed. As mentioned earlier in the review, the lesson here is to know your lighting product’s requirements before attempting to use it with the Light Genie.
Next, I tried out Varied Intensity (effect 20), which the instructions suggest using to simulate an Arc Welder. I had other plans for this effect, however. Looking through my lighting products from my previous N-scale layout, I found a Miniatronics lamppost (#72- 042-01) intended for use in parks or along sidewalks. It has a frosted globe and expects 16 volts, so when hooked to the Light Genie’s 12-volt output, it glows rather dimly. But that gave me the idea of using effect 20 to simulate a gas light from the 1800s rather than an electric light. By adjusting the f licker rate to a very low setting, I achieved a rather believable simulation of a flickering gas flame inside the frosted globe.
Finally, just for fun I pulled out an ancient mini light Christmas set I picked up at K-Mart so long ago I can’t even remember. It’s a set of 30 LEDs that run off a 3-volt battery, so I had to use one of the resistors that came with Light Genie to limit the 12-volt output down to a safe voltage for the LEDs. After some experimenting, I decided that Stepped Lighting (effect 10) looked the best. This effect cycles the string of Christmas lights from dim to medium brightness, to full brightness. I can’t wait for this December so that I can decorate one of the houses on my layout!
Controlling via DCC
To use the DCC features of the Light Genie, you’ll need to download the DCC instructions from the MRC website (they are not included in the packaging) that describe the assignment of DCC Functions and the settings of the Configuration Variables (CVs). The Light Genie supports two-digit addressing (defaulted to 03) and can be programmed via the programming track or via OPS Mode programming on the main line. The Light Genie also supports consisting (via CV19) so that you can consist multiple Light Genies together for simultaneous control (e.g., turning on Zone 1 on all Light Genies). One downside, however, is that the Light Genie does not support CV read back, even when on the programming track. Thankfully, it does support a “reset all” feature via CV125 that returns the Light Genie back to original factory defaults (which I did find in the DCC instructions) — a handy feature should you lose track of the various settings while experimenting.
If you’re operating a small layout with a single Light Genie, I wouldn’t bother using the DCC feature. The handheld remote is easy to use, and you avoid needing to connect the Light Genie to your DCC system. On the other hand, if you have multiple Light Genies on a larger layout, you may want to control them via DCC so that you don’t have to keep track of multiple handheld remotes.
Closing Thoughts
Until now, lighting a layout (for me) has been limited primarily to hooking up a few bulbs or LEDs inside structures. Nothing fancy, nothing exciting. With the introduction of the Light Genie from MRC, however, I now have a different outlook on lighting and have all types of cool lighting effects planned for the layout. Now I just need to find the time…
Light Genie Radio Control Lighting System
#025000, MSRP: $49.98
Supplemental Products
Model Power HO-scale
Block Signal 2 Indication
#1676-1, MSRP: $16.49
Model Power HO-scale
Block Signal 3 Indication
#1680, MSRP: $16.49
Model Power O-scale
Goose Neck Lamp Posts
#6083, MSRP: $19.98
Model Power O-scale
Railroad Crossing Signal Set
#6381, MSRP: $19.98
Model Rectifier Corporation
80 Newfield Avenue
Edison, New Jersey 08837 USA
(732) 225-2100
