

 Review by Mike Ostertag/photos by the author except as noted
Gondolas are freight car work-horses that tend to get “rode hard and put away wet.” It doesn’t take long for them to look like they’ve lived hard lives. There are many varieties of gondolas. The useful car comes in various lengths and can feature a variety of styles to its sides and ends.
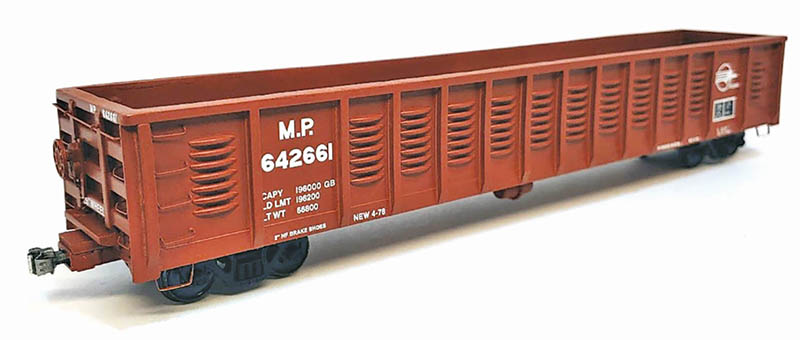
The corrugated sides along with the straight side sills make this Pre-Size Model Specialties model a distinctive example. This S-scale reproduction follows Greenville’s 52 foot, 6 inch prototype. Gondolas represented by this model were owned by four railroads. Missouri Pacific (MP) had 2,672 built from 1977 through 1983. Union Pacific had several hundred built in 1982. Green Bay & Western (GB&W) had 35 built in 1983. In addition to the listed U.S. railroads, National of Mexico or NdeM owned examples of this gondola. In addition to being produced by Greenville in the U.S., examples of this gondola saw construction in Mexico. More than half of MP’s fleet was built in Mexico as were GB&W and NdeM gondolas.
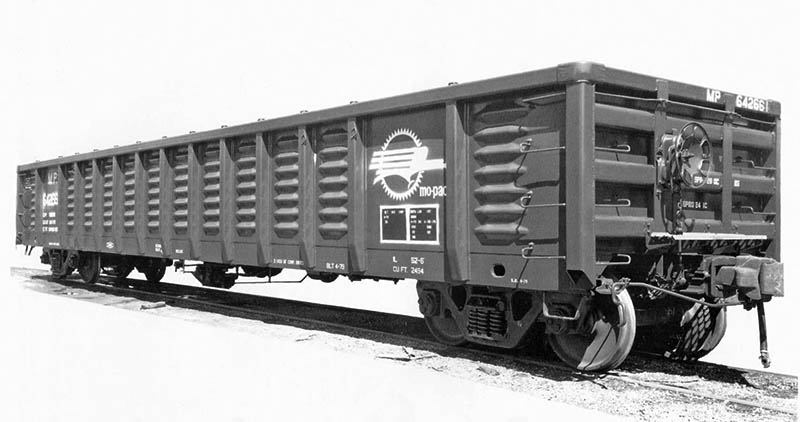
This craftsman kit from Pre-Size Model Specialties is a collaborative effort. Jim Kindraka had the inspiration and did the prototype research for this release. Scott MacKenzie did the computer aided drafting work to develop the 3-D printed parts. The kit comes with decals for Missouri Pacific and Union Pacific. For MP projects, you’ll find both “buzzsaw” and “screaming eagle” heralds present on the decal sheet.
As a modeler, if you’ve ever wondered about the world of resin kits but were intimidated by their typical complexity…then this is the kit for you. I personally am in that exact group. I own several resin kits, but have been absolutely terrified to start building them. However, this new offering by Pre-Size Model Specialties was just what the resin kit doctor ordered.
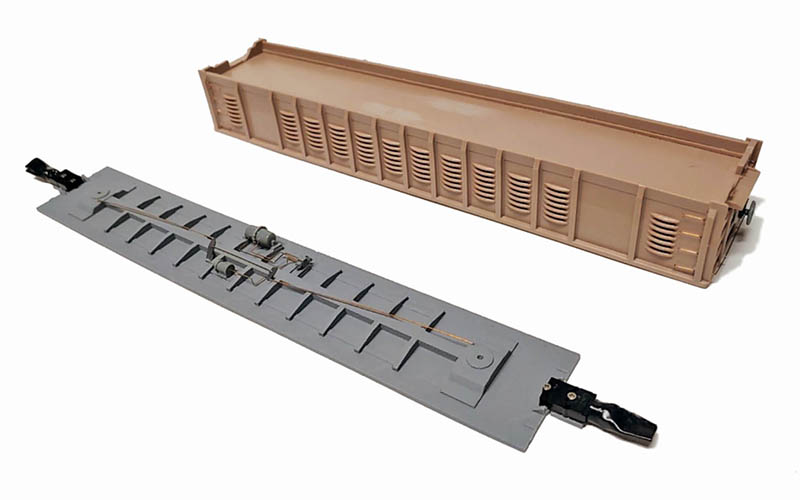
First off, when you open the box everything you need is nicely pack-aged as a kit should be. The body shell and the underframe come wrapped in tissue paper. The detail parts come in a couple small bags. The weights for this are made from 1/16-inch lead. There is a label on the protective cardboard covering the weights, warning the modeler about the need to handle these properly. Please do pay attention to this as it is very important.
Grab Irons are installed and brake details completed. I installed the Sergeant couplers prior to painting, so the coupler boxes could be painted along with the model. I used electrical tape to cover the coupler. This kit is very user friendly. Pay no attention to the missing piece of the carbody by the upper coupler opening. I had a minor mishap after cleaning the car. Kit comes with this fully intact.
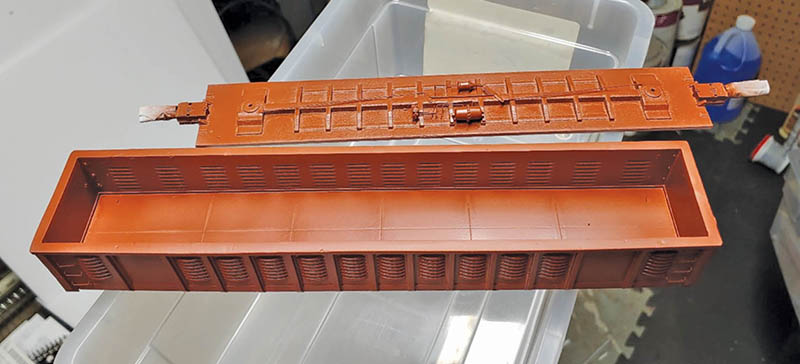
Let’s get into the build. Starting with the main body, the first thing you will notice is some casting flash on the last rib on each side of the car as well as injection nubs on the top of the gondola rim itself. This is all easily removed with files and sandpaper. However, one small note about the top rim of the car itself. Check to make sure that the top rim is level. My model had some fluctuation in thickness, however all I did was take a hobby knife and scrape the rim flush. The body also comes with very handy dimples where the holes for the grab irons are to be located. These are on all four sides of the car. Simply use a #79 or #80 drill bit and drill out the holes. This was an extremely nice feature that I wasn’t expecting. It saved a lot of time in locating proper position of the grab irons. I used some CA glue to install the grab irons. One note is that the very bottom grab irons on all four sides will be drilled into the floor of the car. This will take a little bit of time as to not break the extremely thin drill bits.
The hand brake detail comes with everything you need to make the car as detailed as you wish. There are two different brake wheels. One is injection-molded plastic, and the other is a resin casting. I chose the resin casting, as it more closely represented the as-built car. One thing I would have liked to see on the car is see-through walkways on the ends over the couplers, however these cast-on solid walkways on each end of the car could be easily replaced by the modeler, if so desired, with see-through etched-metal sections. Another small detail that was over-looked was that there were no wire lift rings in the kit for the long grab iron across the ends of the car. The modeler will have to either find an alternative, such as bending their own, or possibly using a commercial detail part. I used S Scale America EMD Eyebolts (#SSA172) from Des Planes Hobbies. The kit includes a piece of .015-inch brass wire, which is long enough to create both grab irons and do some of the underbody detailing to the brake system.
Speaking of the brake system, this kit comes with some very well-done brake details that will allow the builder to take this model to any level of detail they so desire. Along with the usual brake cylinder (which by the way comes with a separate piston linkage so the modeler can create either a “brake on” or “brake off” effect), triple valve and air reservoir (which is a two piece casting), the car comes with the proper levers to build virtually the full air pipe system under the car. The triple valve even comes with dimples cast into it so the modeler can drill out holes for the piping. I used .015 phosphor bronze wire available from Tichy Train Group to create the brake pipes under the car.
I used Tamiya Fine Surface Primer Light Gray (#87064) in a spray can as a first coat on this gondola. The paint itself is combination of Vallejo Air Paints that produced a great looking Boxcar Red color.
The rest of the underframe is also cast in a lower grade resin. This makes a lot sense as it is the underframe and won’t be seen as a general rule. With that said, Pre-Size Model Specialties did a great job of making sure the underframe had gluing pads, as well as dimples on each end of the car to drill out for the trucks to be screwed too. Now the kit I received had an underframe that was about .040-inch too long and the company offered to replace the underframe. However, while I was waiting to receive it, I decided to just go ahead and file down the piece by taking .020-inch off each end. This modification had no negative effect on the finished gondola at all. As a matter of fact, the underframe fits so nicely and snug that I didn’t even glue it in place.
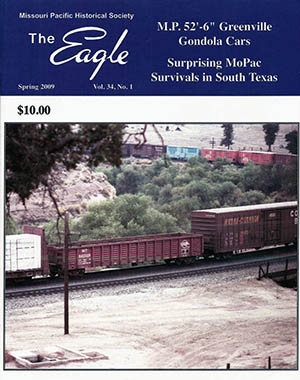 When it came time to paint the car, I decided to use Vallejo Air Paint. After looking at many online photos of Missouri Pacific gondolas and the very informative article in the Spring 2009 Missouri Pacific Historical Society magazine The Eagle, I decided on using a Boxcar Red color for the entire car. With the Vallejo paints this would have to be mixed. So, I resorted to Joe Fugate’s “Guide to Acrylic Painting in a Post-Floquil World,” from Model Railroad Hobbyist. This resource has a great chart outlining some of the most popular railroad colors and how to mix them using Vallejo paints. Vallejo Air Medium Brown (#71.038) and Vallejo Air Brown RLM26 (#71.105) made a beautiful Boxcar Red.
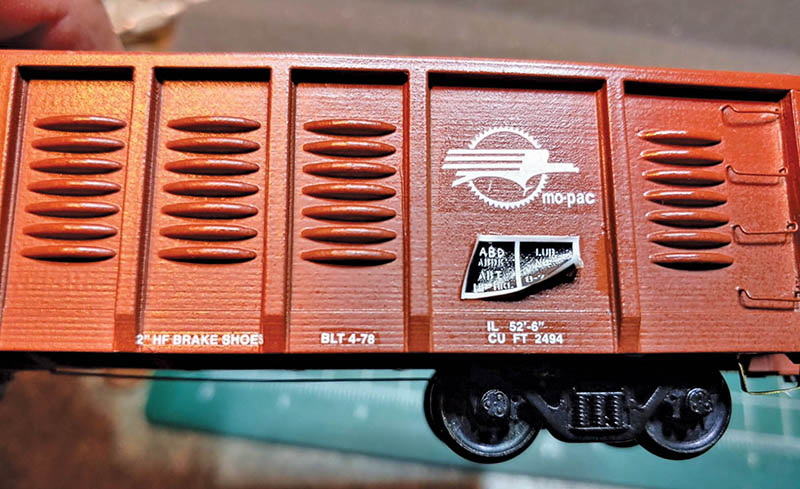
The supplied decals went on with ease, except the COTS decal on each side. However, I was able to get them to lay down after some effort and patience. I believe this is simply due to the black being a bit more difficult for the setting solution to penetrate. However, once it did the result is amazing. All lettering and heralds provided in this decal set are sharp and easy to read.
Once painting was completed, I used the supplied decals and applied them as I would normally. The decal paper is very thin and is almost invisible once I applied my setting solution. The lettering on the decals is extremely crisp and well done. There are enough decals to produce two different MP cars or one UP car. There are also extra numbers on the sheet, so nearly any road number is able to be modeled. A couple of quick notes on the decals. First, this would be a great car to learn on. There are no decals that need to be applied around any details or ribs on the car. This makes for a very easy and quick decal job across a smooth surface. The one exception is that one of the “’2’ HF Brake Shoe” decals was a little too long for the space that it was intended to go. I put it there anyway, but when (and I do mean when) I buy my next one, I will do a bit more research on this specific lettering on the car and place it in a more “user friendly” location. Second is the COTS decal. This is a very legible decal. However, boy was it a tough one to get to lay down. Both sides wanted to curl and it took quite a bit of time to get them to settle down. This could have been caused from my impatience or maybe something with the paint. I finally got it to behave by using a combination of Solvaset and Micro-Sol products.
This release provided me an amazing introduction into the world of resin kit building. Pre-Size Model Specialties hit a home run with its S-scale gondola kit! Time to add some extra details, like air hoses and pin lifters, to this S-scale gondola.
The builder supplies trucks and couplers. The trucks you see on my gondola are American Models, but I will be replacing them with 100-ton trucks from Smoky Mountain Model Works. I used Sergeant Engineering-made couplers. All in all, this was an absolute blast to build. For my first ever resin kit, I have to say it gave me a lot of confidence to buy more. I hope that you all find as much pleasure in this kit as I did!
Pre-Size Model Specialties S-scale
Greenville gondola
#PS576, MSRP: $75.00
Pre-Size Model Specialties
P.O. Box 147
Paonia, CO 81428
970-527-4586
 This review appeared in the