 Review by Dick Foster/Photos by the author, except as noted
At the beginning of 1961, Santa Fe faced an increased demand for coal delivery — unusual for a railroad steeped in hauling grain and commodities other than coal. There was a shortage of heavy-duty gondola cars throughout the system to meet the coming business demand. The railroad turned to its Topeka, Kan., engineering department and then to its shops for an answer to this problem.
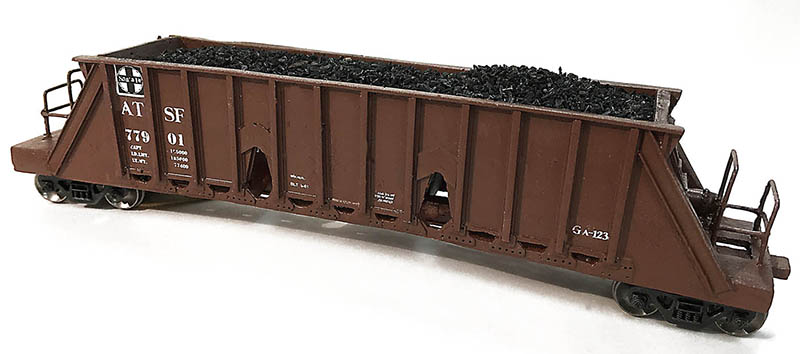
Santa Fe designed and manufactured a series of more than 70 cars with a new triple-bay gondola-style. The design was so successful that many cars stayed in service until scrapped in 1987. As originally designed, the first 60 cars had square ends, but the subsequent build of another 15 cars came with reinforced ends. These cars transported coal mined near Gallup, N.M., to Joseph City, Ariz., for the Cholla Public Service electric generation plant. Each car was fitted with six air motor-driven door pairs for quick release of the coal. This speedy opening and closing of the air-operated bottom doors, combined with the 75-degree sloped interior of the new car, made fast work of unloading the long unit train.
With its air motors actuated in this image, a Santa Fe Ga-123 shows off its ability to open and unload from all its bays simultaneously. This 1961 prototype was a 90-ton coal hauler that worked exclusively in the southwest for Santa Fe. — Simmons & Boardman collection
Concept Models GA-123
A search by editor Tony Cook and myself revealed several pictures and variations of the original Topeka Shops design. It appears that the Concept Models HO scale model is based on a late car design with reinforced ends, giving the car its distinctive shape.
Concept Models, based in Stockton, Calif., has been a long-time designer and maker of unusual types of model rail cars, and this appears to be another entry into the company’s hopper and gondola lines. As with Concept Models’ other releases, this car is made with resin castings, not injection-molded plastic. Concept Models supplies warnings and guidance information in the kit’s instructions about the preparation and handling of this material. It was my first time in more than 50 years of kitbuilding that I assembled a resin kit of any type, and it proved to be a challenge. I typically work with wood and plastic injection-molded parts. Resin was a new world for me. When comparing the model to the photographs of the prototype car I was a little taken back by how clunky some of the detailing on the model appears. An example of this is the stiffener plates that are located above the openings on the sides of the car. The modeled plates are much thicker than those on the prototype.
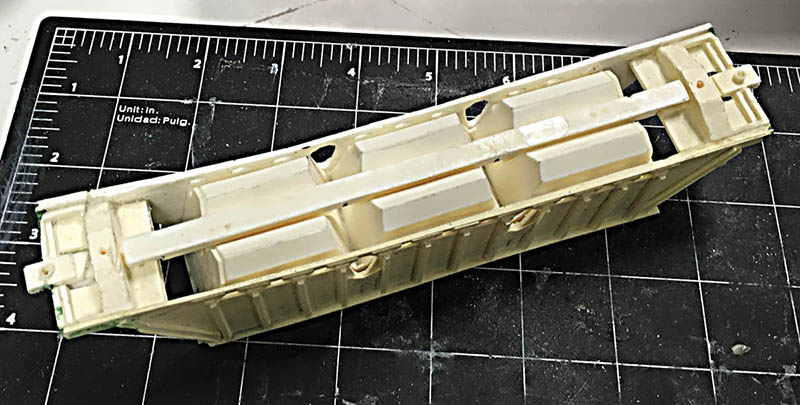
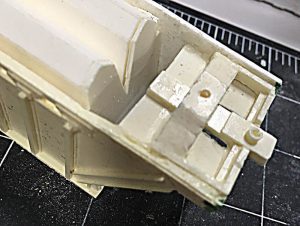
This bottom view shows the six air-opened chutes for unloading. It is unfortunate that more underbody detail could not be modeled, but much of the air motors and piping would not be visible.
I began by reading the complete, simply written instructions and was ready to go. The instructions list a number of required tools, drills, and wire. This kit was not a “shake and bake” assembly! The biggest part of assembling a resin casting kit is cleaning all the f lash and mold overruns that appear around the edges of the pieces. A new, sharp No. 11 blade and sanding stick along with some needle files helped remove all this excess material. As the instructions pointed out, thoroughly wash all parts in liquid dish washing soap using a soft sponge scrub to ensure that ACC glue and paint will adhere to the castings. These parts were allowed to air dry until the next day.
The next step was to ACC cement the two ends to the hopper casting, which also provided the necessary weight for the car. After these two ends had dried, the next step was to cement the long hopper sides to the casting. It was then I noticed the two side castings were of different thicknesses and lengths — one had warped upward, and the other warped downward at the ends. It took me a while to alter the side castings so that they would fit together. After several test fittings and lots of sanding, I finally had a position that seemed to be satisfactory, even though the two ends have slightly different lengths. This became critical when installing the end decks since they also determine the wheel centers (47 scale feet apart).
I failed to notice that the smooth end pieces glued to the hopper casting were wider than the casting, which allowed the sides to flex. I salvaged this error on my part by razor sawing between the sides and hopper casting, allowing the sides to seat themselves against the casting. I used additional thin ACC to make a good tight joint. Looking back, I might suggest painting the underbody casting before installing the center beam, because it is hard to spray or brush paint after the sides and center sill were in place.
The underside of the end decks held the coupler pocket and the truck bolster. The distance between truck centers was supposed to be 47 feet. The shorter side beams allowed only 46 feet measured between the truck centers for me.
The next step was probably the most challenging — cementing the end deck and the end sill and coupler pieces onto the bottom side braces. The two ends were different lengths, and the car was designed minus a guide ridge or comment on how close the end should be to the hopper body. I decided to move the deck assembly as close to the end of the beams as possible. Finally, I used a scale rule and measured 47 feet between bolster mounting holes. It was a compromise, but the final measurement ended up about 12 scale inches too short with the end deck sticking out beyond the side beams. A little Squadron Green putty was used to fill out the missing beam ends, and the car looked fine with the trucks in place.
Two additional shortcomings of this kit were the lack of wire to make handle rails for the two ends and a lack of a scale drawing to show the exact shape and height of the rails. There were some very faint hole-locating dimples in the casting, but they were very hard to use as a guide. The company explained that this and several other missing items helped keep costs down. I then drew a template and soldered the railing together. I then drilled new mounting holes.
The other thing I noticed were locating dimples on the sides for short and long ladders as in the original square-end cars. I used liquid Squadron Green Putty with a brush to cover these spots since the final car shows no ladders. I will be adding stirrup steps to the car in the future. To make matters worse, I found no mention on how to locate the three pieces that comprise the AB brake equipment. Some research on the internet showed a general location on the end sloping panel and the deck. As to the brake wheel, I will find a good clean part from my scrap box and replace the stock resin casting, which was flashed in between the spokes of the wheel. Again not a big deal, but it is just another part I had to come up with for the sake of a fair-looking car.

This view of the B-end of this hopper car model shows where I mounted the brake parts. I didn’t find guidance on this part of the build in the instructions but reviewed prototype images for help.
Per the kit’s instructions, I sprayed the whole car with a gray primer and let it dry overnight. The final coat of color was a Tamiya XF68 brown — maybe not the exactly right color, but the correct color was not available at my area hobby shop. I let this paint dry overnight. I then gave the car a gloss coat in preparation for the decals.
Be sure to follow the instructions on the last page. The two Santa Fe circle-cross heralds fell apart when they got in the water mixture. I made two new heralds, and they look fine to me. Overall, I didn’t find these decals to be as good as Microscale products. From my experience, the decals were difficult to get off the backing and didn’t just float as the instructions implied. The font style was incorrect for the Santa Fe, which used a Railroad Roman font for its lettering. Again I should have thrown the decals away and used Microscale decals to letter the car correctly.
I finished off the car with an overall spray of Dullcote to seal the decals and complete the model. Install your choice of trucks after drilling the proper screw hole in the bolster or use a self-tapping screw. I choose a pair of Athearn 36-inch wheels per the final rework of the prototype car. No couplers are included with the kit, which I will add at a later date.
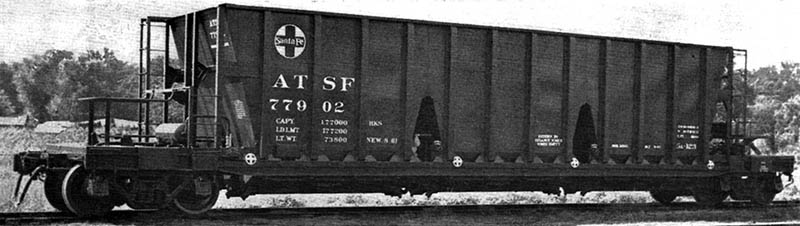
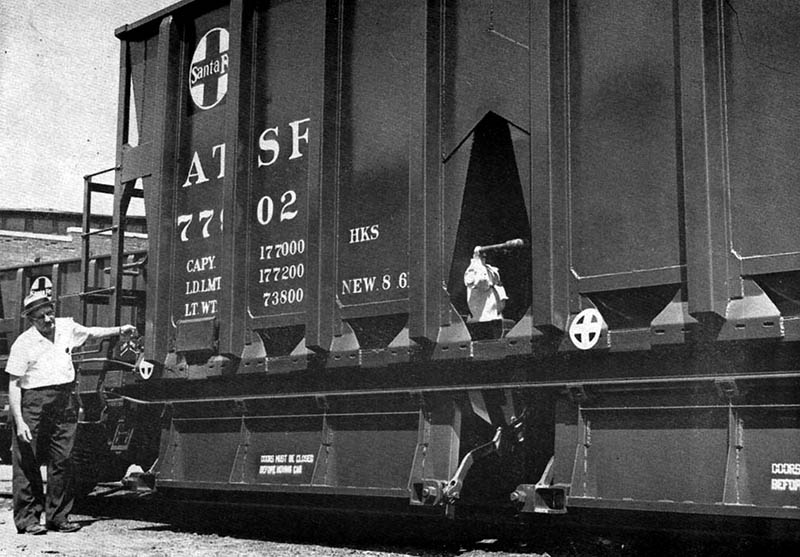
This view of Santa Fe 77902 shows the original design for these cars. Concept Models presents the redesigned Ga-123 with triangle pieces added on the ends of the hopper section to allow greater loading of these coal cars. — Simmons & Boardman collection
Summary
A few of these cars for your coal-hauling model railroad might be a fun addition. This Concept Models offering would certainly be an eye-catcher on many layouts. I am sure that if I worked on more resin kits, the process would become easier. However, the overall poor quality of the car would challenge even the most skilled modeler. I would state that this is not a beginner’s kit for sure. Some parts of the instructions might confuse and frustrate some less experienced modelers. If possible, more pictures of certain details in the construction process should be included. Concept Models could do basic research that would make the cars far more accurate and enhance the enjoyment of the build. Having the wrong fonts in the car lettering negates the inclusion of decals at all. No end lettering was provided, nor were the stylish circle-cross reflectors that really add that Santa Fe flavor to the car. Concept Models is to be thanked for producing some unusual heavy-hauler specialty cars. It is good to see a model of this unique Santa Fe coal hopper car in HO.
Concept Models HO-scale
Santa Fe GA-123 3-bay hopper car kit
MSRP: $24.99 (single)
and $69.99 (3-pack)
Concept Models
8810 El Toro Way
Stockton, CA 95210