 Review by Steve Lucas/Photos by the author
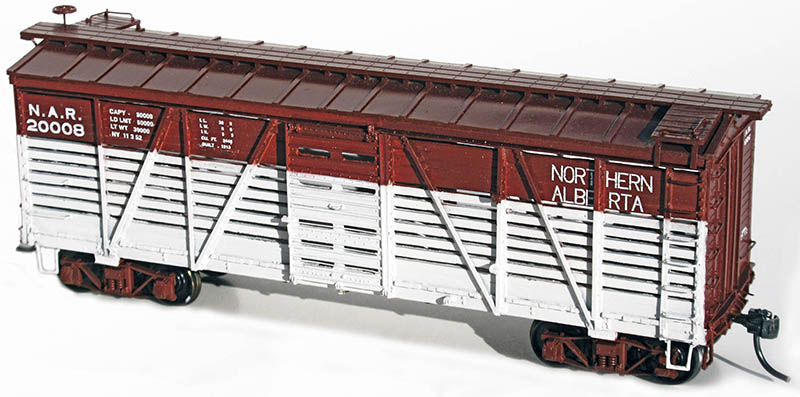
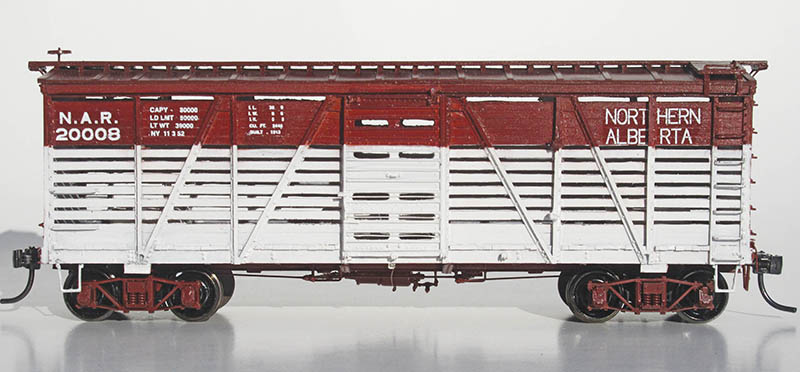
Northern Alberta Railways (NAR) was jointly owned by Canadian National (CN) and Canadian Pacific (CP) railways and ran north and west from Edmonton, Alberta. From 1929 to 1981, when CP’s half share was sold to CN, the NAR offered freight and passenger service. Before the oil industry became a major player, northern Alberta saw a lot of ranching. Northern Alberta Railways played a part in moving livestock from the cattle-raising land in that part of the province to the large centers of Canada.
In the early 1950s, the NAR needed newer stock cars. Being a child of Canada’s two major railways, it got much of its rolling stock from them. Its stock cars were no exception. CP sold the NAR 30 obsolete 36-foot long Fowler boxcars. The NAR refurbished these and converted them into stock cars in its Dunvegan Yard shops in Edmonton, Alberta. These cars had been built as boxcars for CP from 1909 to 1914, with different variations between builders and with improvements over the five-year span of building these cars. This also resulted in subtle variations between most of the resulting stock cars because the NAR had to custom-modify each car to suit on account of the variations in the cars as received from CP. As these cars aged, they were used for company service such as hauling newly treated crossties. The creosote vapors in a closed car of ties would be toxic, so stock cars were used to carry them, resulting in many of the cars being painted entirely freight car red.
Instructions are provided to model these as OCS (On Company Service) cars. Westerfield has been around for more than three decades making very well-detailed HO-scale resin car kits. Westerfield’s kits allow for models of some very uncommon cars to be built easily by the modeler. Follow the instructions, and a built-up Westerfield car kit will be the equal — if not better — than many of today’s ready-to-run plastic models or the best brass cars. Westerfield’s modular approach to kits allows the company to offer many variations of almost any type of freight car, such as one-of-a-kind cars that may never be made. These kits for several variants of Northern Alberta Railways’ stock cars are a prime example of how well their system works.
Westerfield’s kits for these Northern Alberta Railways’ stock cars are offered in 10 varieties to allow the modeler to match a particular car. Each kit has specific parts to match specific cars, even having two different versions of roof castings in the reviewed kit. This is an example of the prototype conformity of Westerfield kits. Each kit comes with detailed instructions on building the basic car and a “Northern Alberta Railways Stock Variations” sheet detailing major spotting and modeling features of almost each NAR stock car built from these CP boxcars. Follow the instructions supplied with the kit, and one can have an almost- or truly dead-accurate model of a specific NAR stock car without need of any information or research on the part of the modeler other than what is in the familiar brown kit box.
Opening the box, the modeler is presented with a number of gray flat resin castings wrapped in tissue paper. There are roughly 60 discrete parts joined by very thin casting flash. Casting flash joining the parts can be sanded off quickly by sliding the back of the castings on a sheet of 400- or 600-grit wet-and-dry sandpaper available at a number of locations. The parts will separate from the film very easily. A quick pass of a knife blade on the edges of some parts will liberate stray flash from them.
I strongly suggest that you separate the parts as you need them — there are a lot of small parts that can walk off your workbench, never to return until you’re not looking for them! A saving grace is that Westerfield supplies more than enough of many of the smaller parts in the kit to allow for losing a few — or for future models — bonus! A re-sealable clear plastic bag such as a sandwich bag is suggested to keep small parts from wandering off until needed.
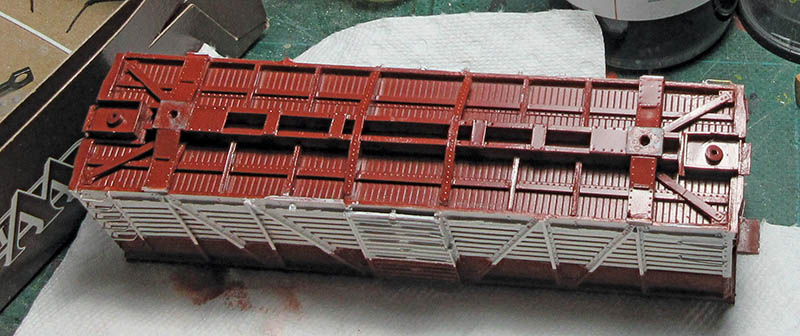
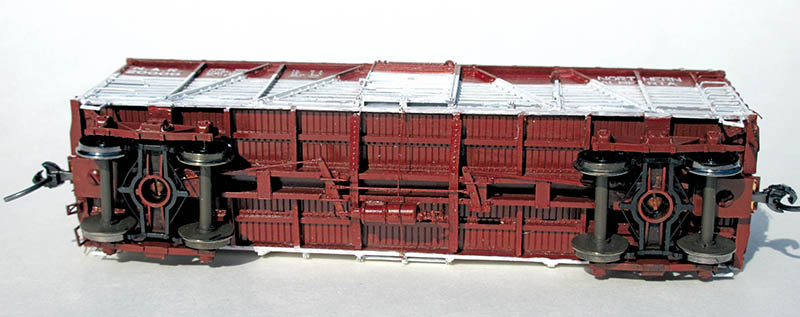
View of the bottom of the car before adding brake rigging details. The pads containing the truck screw holes need to be removed if using True Line Trains’ Simplex trucks.
Included are a flat steel weight, a Tichy Train Group K-brake set, brass wire for brake piping and rods, along with thin-film NAR decals for this car. The modeler supplies trucks, couplers, and paint. I used Tahoe Model Works’ TMW-203 archbar trucks fitted with semi-scale wheels. These appear close to the Canadian “Simplex” archbar trucks used on the particular car that I modeled using this kit. Some of these cars used a Simplex-bolstered cast-steel frame truck.
The kit also includes instructions for building the basic box of a carbody using the parts in this flat-stock release. Read the instructions. Then read the instructions again. Disclosure: I’ve built several of Westerfield’s similar Fowler boxcars, so I’m a little familiar assembling them. The stock car is just the 36-foot Fowler boxcar adapted for hauling livestock. Many of the tips in this article can be used for building Westerfield’s excellent Fowler and “Fowler Clone” boxcar kits as well.
Building the Carbody
When building a resin kit, I start with the basic carbody. This is where the major and sometimes heavy-handed drilling and cutting are required, so the body may get manhandled. I save the detailing for later after the rough handling has been done. I started with the most tedious part of building any resin stock car kit. The backs of the side castings were laid on a piece of 400-grit wet-and-dry sandpaper on a flat surface. A few passes of the side back and forth removed some, but not all, of the flash between the boards. Do not, do not, DO NOT try to remove all the flash in this fashion. I learned this the hard way with a Westerfield CN stock car kit.
The boards should still be about a scale two-to-three inches thick after this sanding. Some of the flash will break away; some will remain. Now get out your X-Acto knife or scalpel with a No. 11 blade in it and scrape the gaps between the boards using the back of the blade rather than the knife edge. The hard square edge of the blade will break off the flash and square up the board openings without cutting into the boards themselves. You will need to go into the smaller openings and cut out little pieces of flash, but this should be the exception rather than the rule. If you’re happy with how the sides look, set them aside for now. Add the supplied wire grab irons and trim them flush with the back of the sides and ends.
The kit has everything that you need to model the underframe correctly, including a Tichy K brake set. Full instructions and model photos are provided to model the brake rigging as shown here.
The next thing to do is to build up the bolster assemblies. These are made up of three parts: a bolster web and upper and lower riveted cover plates. It’s important that you pay attention to the instructions so that you build these up properly. The instructions have photos of the assemblies to help out.
Let’s work on the underframe casting. The center of the bolster pads are drilled 2-56 for truck screws, or you can drill No. 50 and use self-tapping screws. There already are dimples in the casting to help you start the hole for the truck screw. If you’re using most HO trucks, no modification is needed to the bolster. But True Line Trains offers HO AAR “Bettendorf” type trucks with Simplex bolsters (part TLT 900902) used on many Canadian steel-frame “Fowler” boxcars and stockcars. Some NAR stockcars used these trucks as well, including cars modeled by other versions of this kit. If you are using True Line’s Simplex trucks, you’ll need to shave the 0.040-inch thick pad off where the truck screw hole has been drilled, as the bolster on this truck appears to follow prototype AAR bolster height and is 0.040-inches higher than the NMRA Standards for bolster height. Shaving is best done using a razor saw blade to cut the pad off flush with the center sill. Done this way, there is no need to modify the trucks.
You can now attach the bolster assemblies to the underframe, following the instructions. When the CA sets, you can attach the sides to the side of the underframe. The bottom of the side sits on top of the bolster assemblies, which purposely jut out from the underframe. Use tiny drops of CA and take your time to be sure that the sides sit on the bolsters and are square with the underframe. The ends can be added, checking again for fit and only using small drops of CA to attach sides, ends, and floor until you are totally satisfied that the assembly lines up properly.
Once satisfied that all the joints are where they should be, you can flood all the joints with CA from the inside to stiffen the carbody. While doing this, I also add an about ¾-inch long by ½-inch wide by 0.080-inch thick pad made of two layers of 0.040-inch thick styrene sheet to the center of the floor where it meets the ends. This adds some thickness to the floor to hold screws for the couplers. This is also a good time to drill and tap those screw holes to mount the couplers. I do not use the flat steel weight provided in the kit, though you can if you prefer. Do not install the supplied flat weight until after you’ve built the carbody, or any lack of flatness in the weight will be transferred to the underframe, giving you trouble assembling the carbody later.
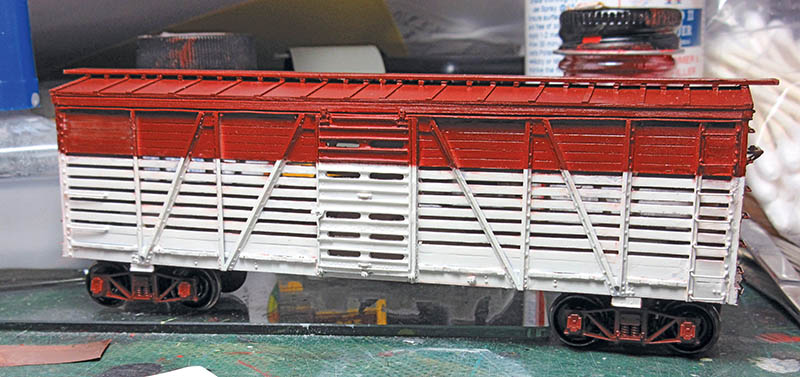
The stock car is assembled and painted. It awaits decaling on my messy workbench. Excellent built-in detail is a hallmark of Westerfield kits.
I took all the parts of the car, including trucks and couplers, and placed them on a digital scale, along with enough stick-on tire weights to bring the car up to 3½ ounces weight per NMRA specs. Stick the weights to the floor inside the car and paint the inside of the car, including the weights. I used flat white paint to give the appearance of the inside of the car being treated with quicklime for disinfectant after the car had been cleaned of livestock waste, though I left about the top 1/8-inch of the inside of the car unpainted. If you plan to use the flat steel weight supplied with the kit, now’s the time to install it. RTV silicone rubber is best for this because it does not have any nasty solvent to eat through the floor casting.
I’ve built about eight or so Westerfield Fowler cars, so this next step is a huge improvement from what I’m accustomed to when building these cars. It used to be that you had to make the roof supports up of a ridge pole casting fitting in cast ridge peaks attached to the top edges of the car sides. This was always a bit of a job to build up and install in line with the rest of the carbody. No longer!
Included in this kit is a new cast roof support/ridge pole assembly that has these parts already cast together to mate with the inside top edges of the carbody. It simply drops right into place inside the carbody and is secured to the sides and ends with CA. Just be careful that this roof support is flush with sides and ends before committing this piece in place forever with a flood of CA at the joints. This new roof support casting makes the job of roofing the car so much easier! A true improvement on what used to be a real pain while building these cars.
Mark the centerline of the roof on the ridge of the roof support, using a scriber, knife, or fine marking pen. Scribe carefully down the center on both sides a few times so that you almost separate the roof halves. Now break the “steel” roof panel in half lengthwise. It’s easy to CA the roof in place when you do this. Carefully add small dots of CA to one half of the roof support casting, now that it’s in the car body. Then place one half of a roof panel with the straight broken edge along the centerline that you established on the roof support. Work from the centerline. Since you’ve only used dots of CA, you can always run a razor or knife blade carefully along the joint between the roof panel and support to remove the roof panel if you get this wrong. All is not lost — sand the mating surfaces smooth and try again. With the one roof half secured in place, add the other, placing the broken edge of the second half against the mating broken edge as you lay the second roof panel half in place.
This kit builds up into a nice model of a specific Northern Alberta Railways stock car. Ten different kits for NAR stock cars allow the modeler to build almost all variations of these cars.
Let the CA set and turn the car upside down. Rub the roof’s running board supports against some 400-grit wet-or-dry sandpaper carefully to level them out. Take the time to be sure that the carbody is square to the sandpaper as you do this. Only slide the running board supports on the sandpaper long enough to flatten them out. Done properly, you now have a flat and true surface to CA the running board in place. Carefully test-fit it in place on the supports. I find the center of the running board, and tack it in place using drops of CA starting with the supports in the center of the roof, then work outward, adding CA to supports as I attach the running board. Again, it’s easy to slide a razor blade under the running board to lift it off and re-do your work if you have to.
 With the basic carbody assembly complete, it’s a good time to add the details. The supplied stirrup steps are best installed by first marking off the location of the holes for installing the pins on the stirrup castings. I use a spring divider set to the correct spacing and gently push it into the bottoms of the side and end sills, creating dimples to drill into. There is not a lot of material to drill into — you might consider progressively drilling these holes from a small to larger diameter drill bit so as not to break the material in the sills. Other details are easy to add, following instructions and model photos.
Painting and Finishing
With the model complete, I washed the car, using my preference of warm water and Comet scouring powder scrubbed in with a cheap small flat artists’ paintbrush. Comet does not have lanolin to prevent paint adhesion (dish and laundry soaps do). Westerfield warns against washing its cars in water, but this is a stock car and will dry out! Rinse well and allow the model to dry. Blow out the little gaps between the running board and roof, and so forth with a source of air such as your compressor because they may hold water. Be sure that the model is very dry before painting and handle with clean hands and/or vinyl or rubber gloves. I find that a clean model can be handled bare-handed, as long as you wash with hand soap, rinse well, and dry your hands immediately before touching the model.
Lacquer-based paints are becoming hard to get these days, but I found Alclad ALC-306 flat white primer at a hobby store catering to aircraft modelers. This paint has a very strong solvent and must be sprayed either using a properly vented spray booth or outdoors. Do not spray Alclad paint indoors without full ventilation and breathing protection such as a respirator. This paint was sprayed on the sides, allowing it to dry before masking.
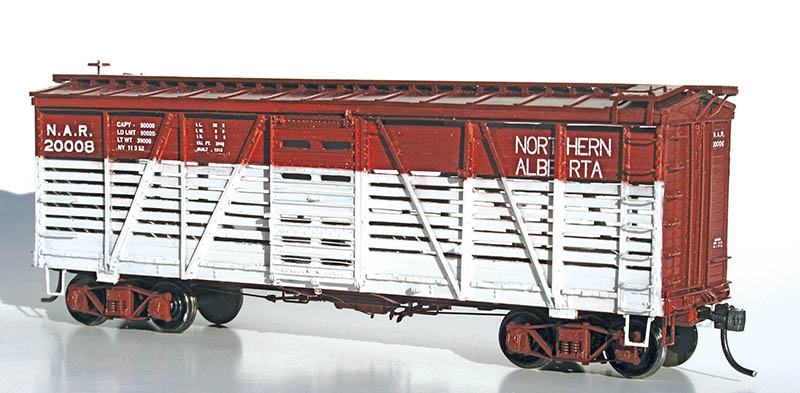
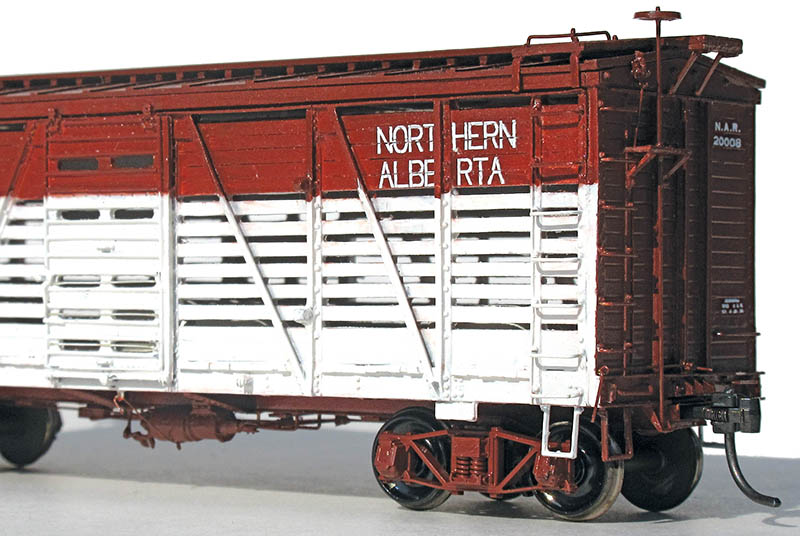
Decals use lettering styles specific to the Northern Alberta Railways, not generic fonts. This is an example of the lengths that Westerfield goes to for the modeler to build an accurate railroad car model using its kits. Canadian stock cars were disinfected using quicklime after animal waste was removed. Thus, Canadian railways painted stock car sides white on the side slats where the quicklime would wash out from the inside of the car.
The side slats and part of the side doors were masked off using low-tack painters’ tape. Tru-Color TCP-63 Oxide Brown is close to the “boxcar red” paint used by CP and the NAR. This was sprayed on the rest of the carbody, as well as the trucks with wheelsets removed. When the paint had dried, I removed the masking. After a little paint touch-up, and we’re ready to decal the model.
The kit includes some beautiful thin-film decals with correct unique NAR lettering styles. It’s obvious that some thought was put into getting this style right — it’s not the same as the “Bury” lettering used by CP, and not a CN lettering style either. Being thin-film decals, I used Microscale’s system for applying them. Micro-Set was first applied over the decals after placement on the model, followed by Micro-Sol for improving their adhesion to the model.
Trucks and couplers were installed, coupler height being checked and found in conformance with a Kadee coupler height gauge. I seldom have to add shims or remove material from a Westerfield car kit to adjust coupler height.
Having built a few of Westerfield’s Fowler car kits, I found this an enjoyable model to build, and one that both turned out very well and produced a well-detailed model. I have a Westerfield CN Fowler stock car partly built that will use a few techniques I learned while building this car.
Westerfield Models HO-scale
Fowler Stock Car kit
Northern Alberta Railways
4260-series, MSRP: $40.00
Westerfield Models
P.O. Box 455
Gardnerville, NV 89410
(303) 658-9343